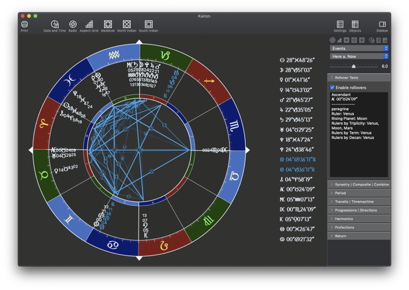
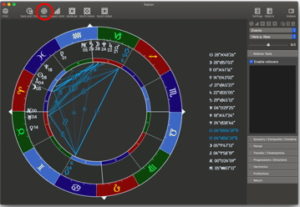
To do a synastry you need to first have at least two charts available in you database, it does not matter though, if they are in the same category or in two different ones.
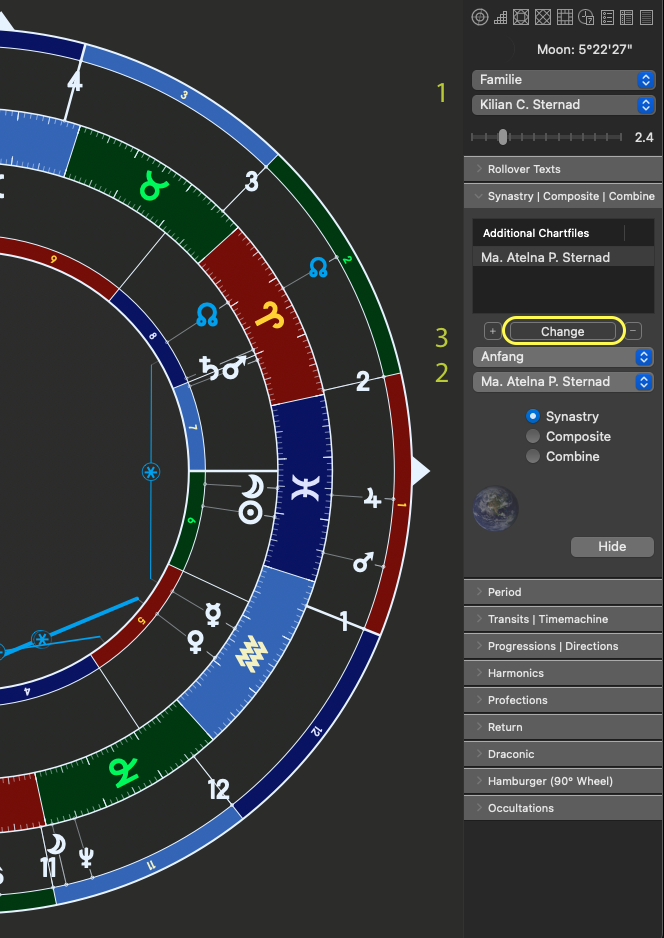
In a synastry you have the one chart, which is the base chart, it is displayed “inside”, and the chart that is to be observed from inside, this one comes “outside”.
the chart inside is the one which is already open… you choose it from the popup menu displayed at number 1 in the graphic
the second chart (outside) is chosen from the menus at 2, by first choosing the category and then one of its charts
this has to be confirmed by clicking “change” at 3 – only then it will be considered by Kairon.
At any time you can simply change the chart at 1 by just selecting, but the chart at 2 has to be also confirmed after selection by clicking “change”.
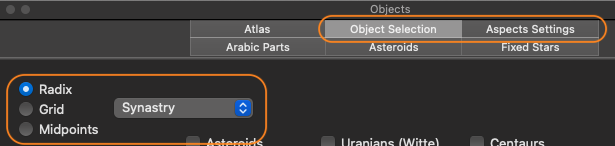
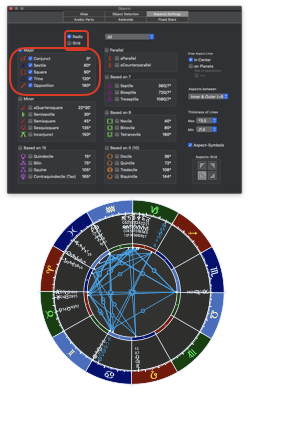
You may want specific settings on which objects to use for synastries and on which aspects to favour, for this the settings need to be specifically changed as hinted at by the following graphic:
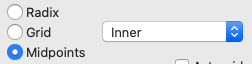
To display midpoints, choose “Midpoint-Trees” from the View-menu. You get the best display option, if you select “none” from the list menu. Midpoint-Trees are available since Version 4.04.
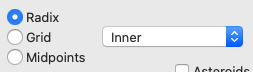
Every object that is selected in Objects dialog at Object Selection: Radix: Inner will be the root of a Midpoint tree as of Version 4.04
Every object that is selected in Objects dialog at Object Selection: Midpoints: Inner will be considered as possible member of the branches of a Midpoint tree as of Version 4.04
Every aspect that is selected in Objects dialog at Aspects Settings: Radix: Inner will be considered as possible aspect displayed in a Midpoint tree as of Version 4.04
Midpoints will, as of now, be cast for the positions of the inner chart, whatever type of chart is chosen.
Please note, that also aspect-orbs and object-orbs have their own setting for midpoints and make sure you set a value that is not too high, there.
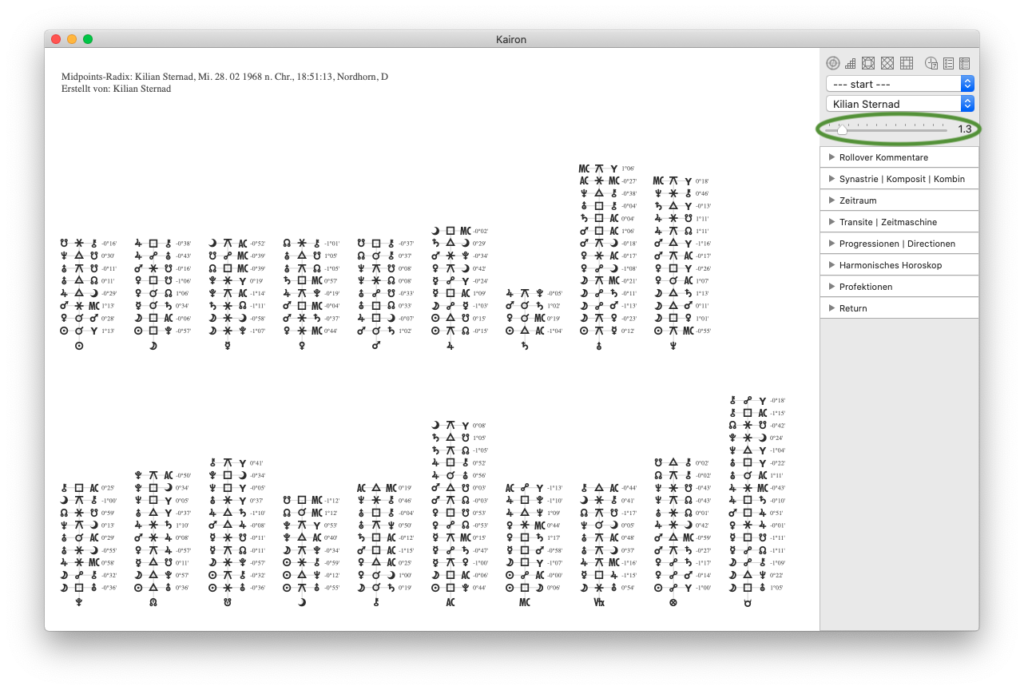
Print
To print Midpoints, make sure that the selection of the Midpoint-view is somewhat resembling the proportion of the chosen page format of your printing dialog. In extreme cases not all of what you can see in the window would be printed, so always first choose page format and then on actual printing have a look at the print-preview first.
Here is how your window should look for landscape view, if the trees grow too high, reduce the aspect-orb with the orb choker (red oval):
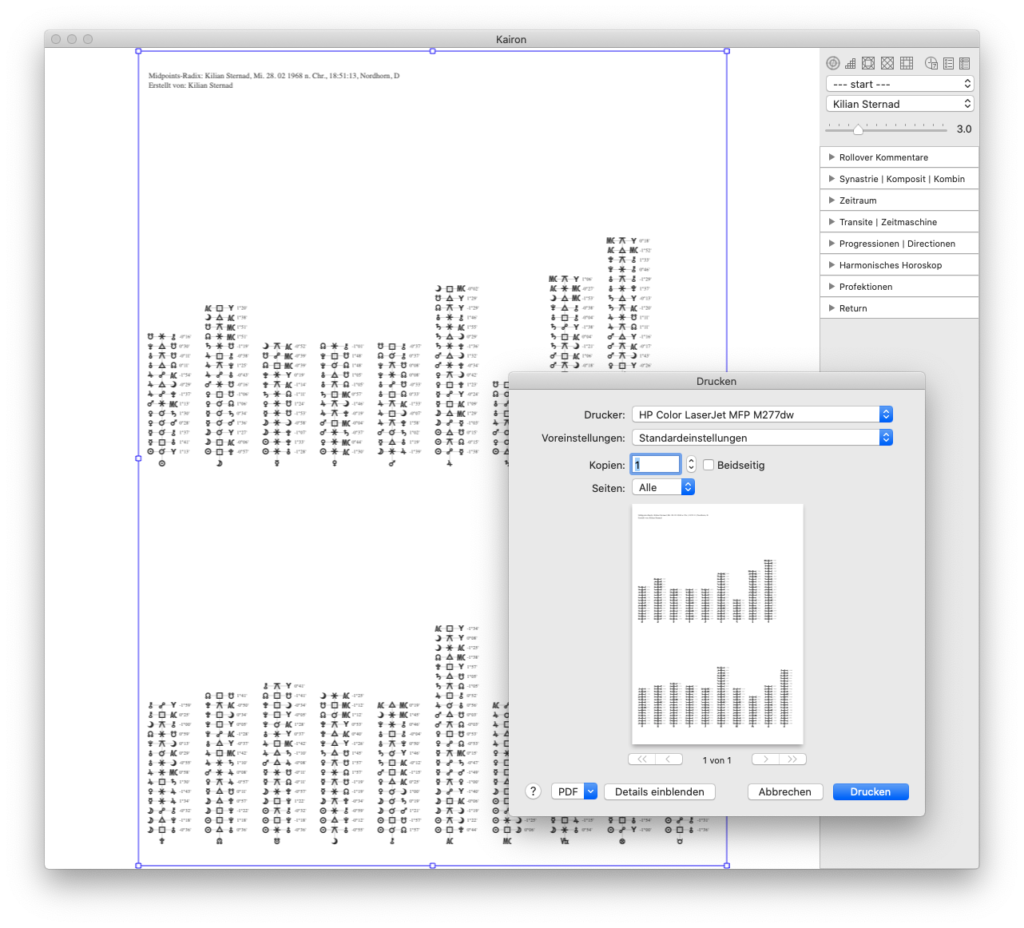
Yet, if you love high growing trees, choose portrait mode and adjust the window like so:
Playing with the settings and with your window setup will soon show you the best way to display and print your midpoint-trees.
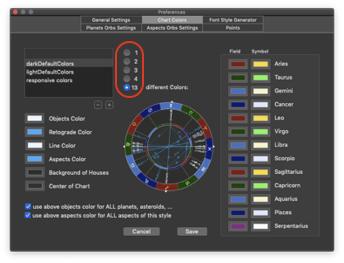
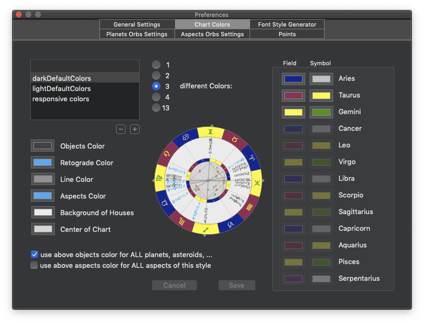
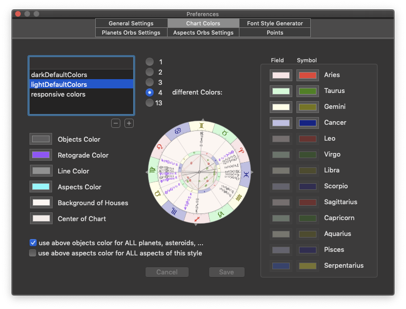
We will open this session by selecting “Settings” and “Chart Colors”.
First thing to do is draw your attention to the 5 numbers in the upper middle of the screen.
1- gives you monochrome and your chart will be set for the colours you choose for Aries.
2-gives you 2 colours and Aries represents all diurnal signs while Taurus represents all nocturnal signs.
3-gives you 3 colours with Aries representing the Cardinal signs, Taurus representing the Fixed signs and Gemini representing the Mutable signs.
4-gives you 4 colours with Aries representing Fire, Taurus representing Earth, Gemini representing Air and Cancer representing Water.
13- allows you to set them all individually.
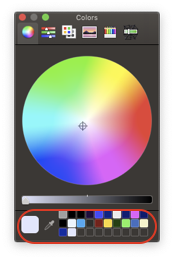
If you like the default colours or feel you may want to go back to them, there is a way to ensure this.
Spend a few minutes with the colour picker tool and make 11 “samples” of those colours (don’t worry the colour picker will generate more tile spaces if you need them).
Simply select each colour in turn and then drag the large sample over to make a tile of it.
To then change a colour is as simple as picking one, the colour will automatically change and you can see the results immediately.
The other way to save the default colours is to save the Kairon 4 .plist.
Be aware that making the Library ‘visible’ (which contains the .plist) involves making a ‘Library’ visible in your user directory.
In here you can seriously mess with the programs on your Mac, so caution is advised.
The path is ~/Library/Containers/com.Kairon.Kairon4/Container.plist.
Now to get to the business of changing colour. I will make two selections, one for ‘Dark Mode’ which will feature modality colours, and one for ‘Light Mode’ which will feature elemental colours.
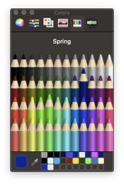
I am not a particularly sophisticated colour guy so I just used the pencil section in the colour picker.
I can and will change the colour of a couple of aspects. Remember that to do this we select the Object screen then the ‘Aspect Settings’ and click on the aspect to get the colour picker up.
So it really was not very difficult to set these both up. Dark mode will be largely events, Light mode will be largely natal (and to get those colours required the colour wheel) and I will see how long it takes me to get bored with it and change it up.
Both sets of colours were chosen to be easy on the eyes and assume I will spend a lot of time reading… plus they both print easily as well.
This concludes the basic set-up, I am sure your preferences will look a lot different to mine. Further help files will showcase just what a powerful tool Kairon 4 is, and why Kairon has been my preferred software for over 20 years.
https://kairon.at/Kairon4/wp-content/uploads/2024/06/LogoKairon4_text-2-300x138.png00Rodney Smithhttps://kairon.at/Kairon4/wp-content/uploads/2024/06/LogoKairon4_text-2-300x138.pngRodney Smith2020-03-29 09:56:222020-04-01 03:24:09Colours: The last of the ‘set up’ help files.
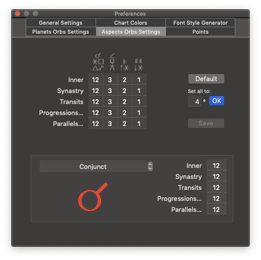
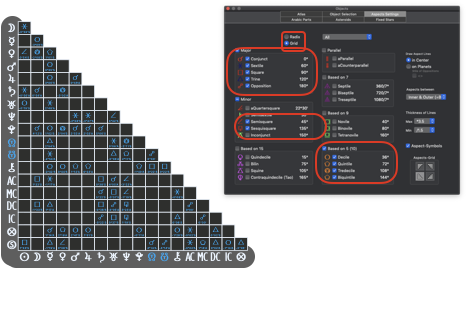
Now we get to the part of the setup which interests me personally the most… the question of orb of aspect.
Again in the ‘Settings’ menu, this time we select ‘Aspect Orb Settings’.
There are 26 aspect types listed in Kairon 4 and if you are particularly fussy about which aspects to draw and what orbs they have you will have to step through them all. Please do not hit the ‘Save’ button if you choose this course as it will overwrite your orb settings with the top set of values.
The the upper panel will allow you to set orbs fairly quickly.
No fractions of degrees can be entered here.
Of course actual aspects are calculated to the arc second of accuracy and listed in the grid to the arc minute.
The bottom pane shows a different calculation for Conjunction and the ‘Save’ button greyed out. Once it is adjusted here it becomes the default for that aspect automatically.
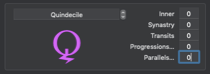
I have no interest in the quindecile aspect so I set its value to 0.
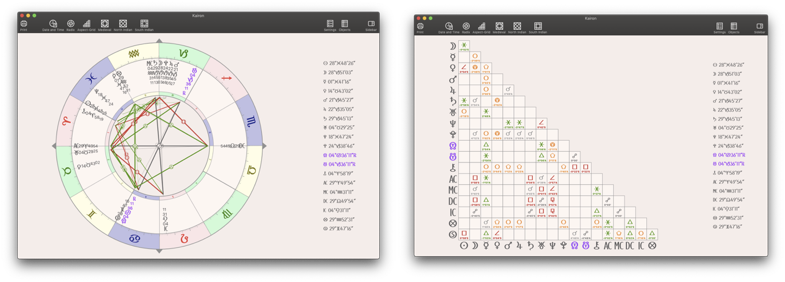
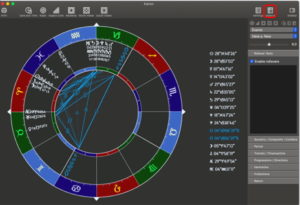
Aspect selection has left my radix a little hard to read so I will make a couple of changes which should clear things up a bit.
I am very adamant about my aspects so I will change up what I can see in the radix and read the full set of aspects on the grid.
To do that we just go back to the objects screen and change what can be seen where.
The end result means that I need to consult the grid if I want to see the smaller aspects but I have less visual clutter on my radix screen.
I will look at changing the colours in the next session.
Here we can change everything, and I will perform a few rudimentary changes to make this software more friendly for me.
Let us deal with those Arabic Parts first.
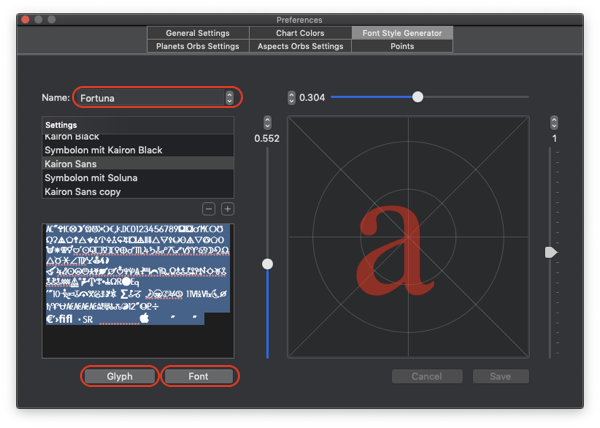
The ‘Font Style Generator’ is where these can be adjusted.
These steps must be done in order to work at all.
Clicking the down arrow on the Font Stye Generator twice will find ‘Fortuna’ (clicking once will get Spirit which I have already done to get the method fresh in my mind).
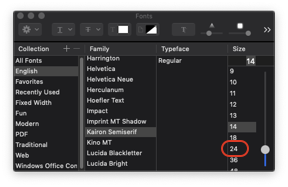
Clicking on the ‘Font’ button will bring up the system Font menu. I have selected the font ‘Kairon Semiserif’ and by default it is in size 14.
Clicking on the ‘Glyph’ button will show you the glyphs in that font, and to see them easily I need to view them at size 24 which must be selected in the system font menu while you have all the glyphs selected.
Once you have identified the symbol you would like to use (I chose the well known Part of Fortune symbol for this one) simply drag it onto the field on the right. Adjust it on the cross hairs with the adjustments directly above and also to its left. Adjust its overall size to its right.
Congratulations you have worked out how to change any symbol in your chart!
The changes made must be saved. If the ‘Save’ and ‘Cancel’ buttons are greyed out, try first to use any of the adjustment steppers, if that does not work restarting the software will be necessary.
A second way to do the same thing but which will allow you to use any image that you have access to.
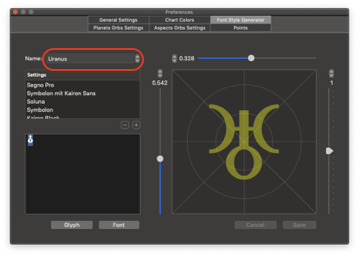
You can use anything you like here. Basically if you can select it you can drag and drop it (or copy-paste if you prefer). I found a symbol which reminds me of the old symbol for Uranus. (it is actually a symbol for Transpluto or Isis, but it looks pretty.)
To empty the field on the left, select all while the cursor is in that field and delete.
To get to Uranus I stepped though everything until I found it.
The picture at the top shows the selected glyph. Dragging it to the empty field on the left makes it the only thing in that field.
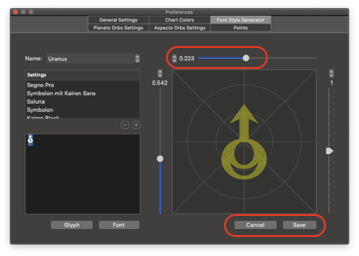
Dragging it from the field on the left onto the field on the right changes the glyph. Minor adjustments will need to be made using the steppers for position and size.
The Cancel button will return the glyph to its previous default, the Save button will lock it in as the new default. Again if those buttons are greyed out Kairon will need a restart.
So that is how you can change any glyph.
If you are fond of many asteroids and have a supply of images there are very few limits to your creativity.
https://kairon.at/Kairon4/wp-content/uploads/2024/06/LogoKairon4_text-2-300x138.png00Rodney Smithhttps://kairon.at/Kairon4/wp-content/uploads/2024/06/LogoKairon4_text-2-300x138.pngRodney Smith2020-03-26 10:41:072020-04-01 04:44:34Back to the Settings Menu
Kairon4 enables easy handling of the asteroids offered by astro.com. You can choose from a list of over 11,000 asteroids. Once selected, the associated ephemeris is automatically loaded and installed by the server so that the position of the selected celestial body can be calculated.
Add and Activate
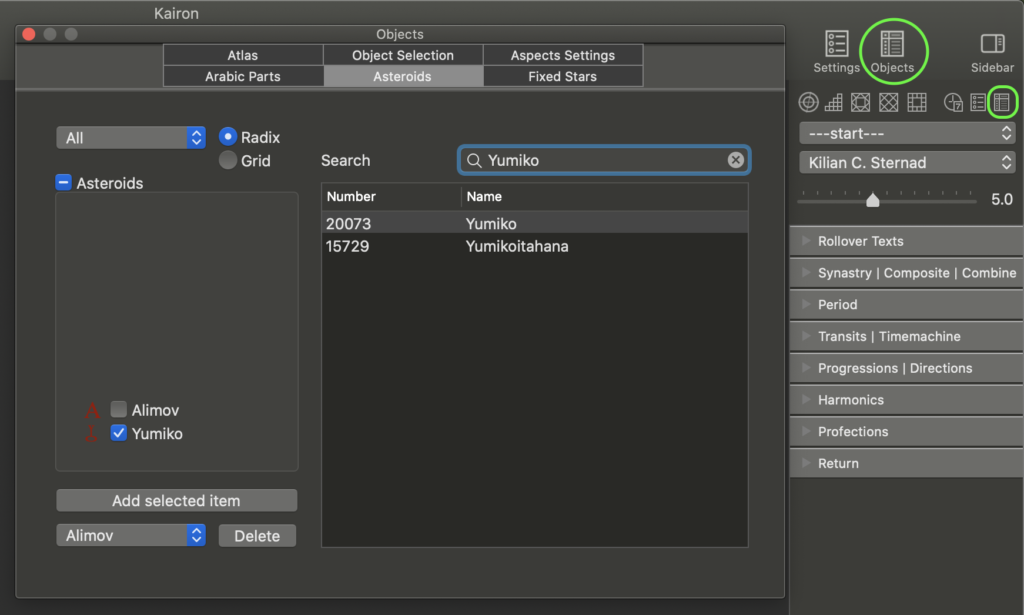
Use the framed button to open the Objects dialog and click on “Asteroids”:
When an asteroid is added for the first time, its ephemeris file is automatically downloaded and installed from ftp.astro.com. To be able to access this file, Kairon4 MUST be in the “Applications” folder.
Only by clicking its checkbox is the asteroid really activated. You can check this live – it appears and disappears again immediately from every displayed graphic, such as the horoscope view.
You can easily see if an ephemeris has not been found, whenever an asteroid is displayed at position 0 ° Aries. If it is not at 0 ° Aries, everything has worked so far ?
First, an asteroid is represented by a generic symbol – in this case a capital “A”. You can easily change this “A”, as well as any other symbol of any other object in Kairon. For detailed instructions, please click on the following link:
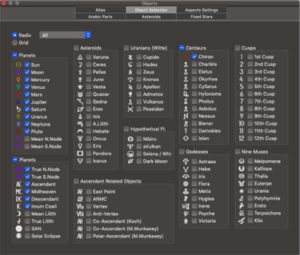
If you are like me, you will have your own set of ‘pet objects’ which you like to see in a chart, or maybe you have heard about one which you would like to try. Selecting objects in Kairon 4 is very easy.
The object selection screen is very large and quite comprehensive. My selections for regular reading are shown, yours will probably be different.
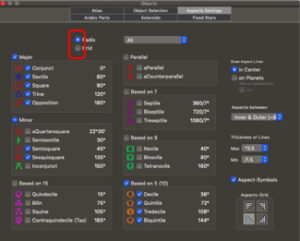
While we are in the objects menu I will set up aspects. Now this window will only tell you which aspects to display, it will not allow the setting of orbs etcetera, that we will do when we get back to the ‘settings’ screen.
Colours can be set here by clicking on the aspect then selecting the colour you want from the colour picker.
However, do remember to select both the Radix and the Grid for visible aspects. Some people may like to see different sets in the Radix and the Grid, this gives you that option.
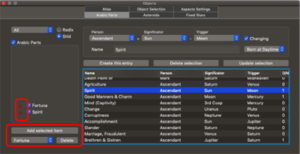
While I am still selecting objects I had better select my favourite Arabic Parts.
First you must find your part in the main column (or create it but that is for another discussion). Then it can be added by the ‘add selected item’ button, at which time it appears both on the list to the left, and on the drop down menu from which it can be deleted if required.
As you can see Arabic Parts come up with a generic ‘placeholder’ which I will replace with glyphs when I get back to the ‘Settings’ screen, but for now I have just selected them, (like I have selected aspects without doing anything to them).
Colours again can be changed here by clicking on the ‘added’ item. The colour will apply to the glyph when that is changed as well.
Again make them visible in the Radix and Grid if that is what you want.
I will proceed to show you how to change glyphs, but if you are impatient then it has already been talked about when discussing astroids here: https://kairon.at/Kairon4/en/custom-symbols/
Whether you are new to Kairon, or you are upgrading from Kairon 3 this should be instructive.
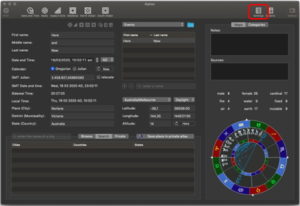
To get a basic chart Kairon 4 is set up to give you a chart for the current moment. It sets ‘Radix’ by default which is another word for ‘Chart’.
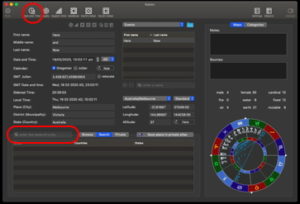
To alter any basic data of the chart, you need to select ‘Date and Time
You will notice that Kairon 4 has made the best approximation of your location based on your Mac preferences. To alter this you need to type your current location into the window towards the bottom left of the screen. Any alterations you make here will change the chart immediately and the record will be changed permanently.
The screenshot shows my location, (entered by clicking the result of the search) but notice on the Right Hand Side of the atlas area firstly that there is a time-zone entry for Melbourne, secondly that the time is set for Standard time, and thirdly that the longitude and latitude are now set for Norlane and the chart has been adjusted accordingly. (29 Aries versus 0 Taurus Rising.) To make this chart accurate I should set it for daylight time. Kairon 4 will generally calculate timezone correctly but it always pays to be vigilant. In this case it used daylight time and by selecting it I changed nothing. (Standard time would have almost 12 Taurus rising.)
Light Mode is the default for older Mac OS systems and looks like this. It is an option in later systems. Dark mode may be changed in your Mac system preferences if it is available at all.
https://kairon.at/Kairon4/wp-content/uploads/2024/06/LogoKairon4_text-2-300x138.png00Rodney Smithhttps://kairon.at/Kairon4/wp-content/uploads/2024/06/LogoKairon4_text-2-300x138.pngRodney Smith2020-03-22 21:35:022020-03-22 21:58:07Kairon 4 from the beginning
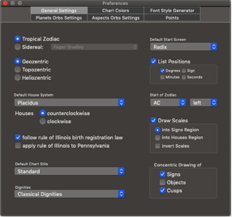
The most general settings are set from the menu by that name which
appears at the top right of the window. Clicking on that will pop up
another window which I have shown below.
The ‘Radix’ default can be set here. My own preferences on this pane are not far from the default and are shown at the bottom.
As I set up this program for my own use you will progressively see the screen shots change.
Of interest here, when I first learned astrology I drew charts
according to what made most sense to me, and being in the Southern
Hemisphere, that was clockwise with Ascendant to the Right, this pane
allows you to do that! It also allows for various Vedic configurations. I
have long since adopted Western Astrological conventions. However you
can have some fun with this!
The next logical step is to input basic birth data. I will use Buddy Holly as my example, but this will work for anyone.
This chart is
September 7, 1936, 3:30 pm (or 15:30 if you prefer) in Lubbock TX
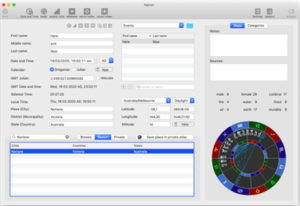
1. Select “Categories” in the top right of the screen.
2. Select “+” at the very bottom of that screen then double click on the strip which emerges. I named this category “Birth Data”
3. Select “+” in the middle of your screen. This will allow you to input data.
4. Enter first and last names in their fields
5. Date is recorded in DD/MM/YYYY format and time is recorded in
am/pm format. Each section of the “Date and Time” window is highlighted
in turn.
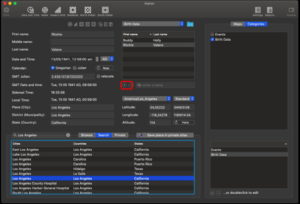
6. Enter the town “Lubbock” in the search field for the atlas and click on the correct entry when you see it.
The data for Ritchie Valens was entered in the “Birth Data” category
simply by selecting the “+” symbol then entering the data as above.
May 13, 1941,12:56 am, Los Angeles, California.
Categories is new in Kairon 4, but allows you to group like charts together.
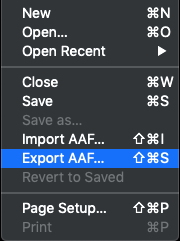
The “Category” in Kairon4 operates like the “file name” in Kairon 3
and multiple charts can be saved in the familiar Kairon 3 format using
the “export AAF” option from the file menu.
There are other exports which are possible in Kairon 4, but this one
is important because it allows you to keep track of your data.
https://kairon.at/Kairon4/wp-content/uploads/2024/06/LogoKairon4_text-2-300x138.png00Rodney Smithhttps://kairon.at/Kairon4/wp-content/uploads/2024/06/LogoKairon4_text-2-300x138.pngRodney Smith2020-03-22 11:44:492020-03-22 22:00:08Basics of data entry
We may request cookies to be set on your device. We use cookies to let us know when you visit our websites, how you interact with us, to enrich your user experience, and to customize your relationship with our website.
Click on the different category headings to find out more. You can also change some of your preferences. Note that blocking some types of cookies may impact your experience on our websites and the services we are able to offer.
Essential Website Cookies
These cookies are strictly necessary to provide you with services available through our website and to use some of its features.
Because these cookies are strictly necessary to deliver the website, refusing them will have impact how our site functions. You always can block or delete cookies by changing your browser settings and force blocking all cookies on this website. But this will always prompt you to accept/refuse cookies when revisiting our site.
We fully respect if you want to refuse cookies but to avoid asking you again and again kindly allow us to store a cookie for that. You are free to opt out any time or opt in for other cookies to get a better experience. If you refuse cookies we will remove all set cookies in our domain.
We provide you with a list of stored cookies on your computer in our domain so you can check what we stored. Due to security reasons we are not able to show or modify cookies from other domains. You can check these in your browser security settings.
Other external services
We also use different external services like Google Webfonts, Google Maps, and external Video providers. Since these providers may collect personal data like your IP address we allow you to block them here. Please be aware that this might heavily reduce the functionality and appearance of our site. Changes will take effect once you reload the page.